Saturday, November 17, 2012

Master bedroom wallpaper

I have discovered that I am not the best wallpaperer ever. This was pretty dicey at times. Here is how it went...

Before doing the wallpaper, I wired the master bedroom for 3 LED ceiling lights. I have been working on fixture designs but I will write about that later when I am done making them. I ran the wires from the living room (where the lighting equipment will be behind a false wall) to the ceiling of the master bedroom. You can just see the two wires up the back wall in the picture below. The wires are very small and I felt sure that they wouldn't be visible behind the paper.


Next I made templates of the master bedroom walls out of pieces of magazine pages. Shown below are 1 of the side walls and the back wall. These I used to cut out the wall paper for the walls.


Below is the cut out wallpaper for one of the side walls. I put it into the house to dry-fit check it. I had to trim it a small amount to make it fit but the templates worked pretty well. There is about 1/4" extra on the end that will fold around the corner onto the back wall. This is because if you end the paper at the corners it ends up leaving a gap according to some other dollhouse decorating blogs.


Next I dry fit all the wallpaper in the room and it looks like the fit is good! One issue I ran into is that the back wall paper is a slightly different shade and scale compared to the side walls, however, it isn't too noticeable unless you realy look for it.


Next I mixed up some adhesive using the powder shown below. It was the only wallpaper adhesive that the hardware store had. I didn't want to use a more permenant glue just in case someone wants to re-decorate some time in the future.


The glue ended up looking like semi-transparent grits. I was a little skeptical about its sticking power so I tested it on a scrap pasted to a cardboard box. It does look pretty good.


I painted paste on the fold-over flaps and then painted paste on the walls, 1 wall at a time. When it was still wet, the wires were really visible. I think I made it worse trying to make them less visible, but now that its dry its not as bad as I was expecting. I can still see the wires on the back wall though, so next time I will definitely hide the wires better, along the corners. One of the side walls had a major wrinkle in it but Kristian saved the day by un-sticking half of the paper so I could re-stick it without wrinkles. I cut the window and door out after the paper was dry. It looks pretty nice in day-light!


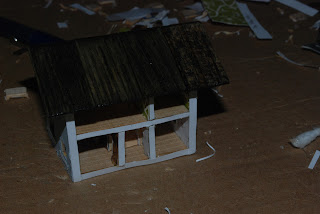
After the stress of doing the master bedroom wallpaper, I wanted to relax and do a fun project to relax. I have been wanting to do this for a while. First i cut out some walls from basswood sheets. These are to scale and match the dollhouse walls
One of the dollhouse sides and the middle floor, you can see the "planks" i carved into the floor
 I cut out all the walls floors and sides and then covered them with wallpaper. Green for the upper floor and white for the bottom floor except red for the dining room.

Then I glued them all together. The floor plan actually matches the full sized dollhouse. The staircase is just a plank with steps marked into it. Below is the structure minus the wall separating the dining room from the hallway.

 I painted the outside with the same paint I used on the outside of the full-sized dollhouse and made a roof out of left over shingles. I also put white wallpaper over the edges to make it look a little nicer.
 Here are some more pictures of the finished product.


Just for comparison...
Miniature dollhouse

Full-sized dollhouse


I think this will look cute in the nursery when it is done :)

Friday, November 16, 2012

Wallpaper

I have started wiring up the house, which is the step that must be completed before wallpapering the interior. Working with the little wires is frustrating because they are hard to see in the evening (which is when I have time to work on it) but also good because I can usually feed them behind walls without having to drill holes everywhere. As of now the plan is to have three ceiling lights in the master, 2 ceiling lights in the nursery, 3 small bathroom vanity lights in the bathroom (and maybe 1 ceiling light), 1 ceiling light in the kitchen, 3 chandelier lights in the dining room, 1 hallway light (maybe a wall sconce?), 3 ceiling lights in the living room and 4 flicker fire lights also in the living room. I think the best way to hide the hardware (mainly the resistors on each circuit) will be to lay everything out on the back wall of the living room and put in a false wall. It won't take much room and wont be visible. Then I can feed the connector cable to the power supply out under the bottom where there is already a small gap between the wall and the bottom of the house.

The next step is wall paper and I have been having a lot of indecision over wallpapers. The only one I have decided on is the master bedroom.


The ceiling will be white and the flooring I am still undecided on. I can't decide whether to do carpet or hardwood veneers (which look really cute but may be more expensive).

Heather suggested doing exposed brick for the kitchen, an idea I love. But I am not going to do real brick in the kitchen because its the hardest room to reach in the house. I hope to use some brick paper that looks something like this...


For the floor in the kitchen I found this parquet on card stock which I thought would look nice with exposed brick...


I will have to coat it with some lacquer of some sort to make it nice and shiny.

I was thinking of using something in the dark red or maroon family for the dining room. Some options are...


Feel free to chime in if you have strong feelings about these or have another choice to add in.

Monday, November 12, 2012

The chandelier

This dining room chandelier was with the dollhouse for as long as I can remember. I don't know the rest of its history. However, one of the arms was falling off so I glued it back on. I am hoping the glue solidifies enough, but I may have to reinforce it with something stronger. I also touched up the silver paint. In any case, I wanted to put lights in it so I did that yesterday evening. I wired up the LEDs and glued them to the candle holders and plugged it in. The glue ended up looking a bit like wax, which was the look I was going for. It's really pretty because the whole thing lights up. I wrapped the wires connecting the LEDs along the arms and will paint them silver so they won't show too much.  Here is how it turned out.

Gluing the bulbs in

First light in the chandelier

Lit chandelier in the dining room

I may add a plug so the chandelier can be taken out without having to break the wires since it was originally removeable. Actually, adding a few plugs may be a useful idea. Although it does add complications. The resistors are matched to the specific circuit so it wouldn't be good to plug the firewood into the chandelier outlet, etc. Also, diodes are directional, meaning current only flows in one direction (which is why I needed a DC power transformer instead of an AC one) so if the plug gets plugged in the wrong way the lights wouldn't turn on. It may be more work than its worth. Maybe I'll just add a plug to the chandelier. Any thoughts?

Sunday, November 11, 2012

Fire!!!

At the end of last post I had just finished wiring together the flickering red and yellow LED's for the fireplace.  The next step was to build the fire. I started with...

A stick from the pear farm
Soldered string of red and yellow flicker LEDs 
Two hairpins to make the grating  which holds the firewood
Kristian helped me cut the hair pins into pieces and then I bent them into shape and glued them together like this...
firewood grrating
Next I cut the stick into "logs". I added two "logs" and glued them in place.

 After this, I glued the LEDs into place between the two logs and then glued all the rest of the logs into place around the top of the LEDs. Finally, I glued two short pieces of log into the openings on the sides.The final result looks like this.

logs with LEDs in the center
The fireplace with the logs, I am imagining the fireplace covered with bricks. I think I want to make a brick platform for the fireplace too. Maybe on a thin piece of basswood. We don't want the fire to sit on the hardwood floor/carpet (not sure what the flooring will be in the living room yet).

The resistor I used was 120 ohms, to keep the current down so the circuit doesn't overheat (which can destroy the LEDs). I soldered in one and soldered the whole circuit to the power supply. Plugging it in was pretty exciting, it works!
Fireplace with lit "fire"

Very excited with how this turned out. I wish I had made the glue less conspicuous but its hard to see when its glowing :)


Saturday, November 10, 2012

Sealer, fun with paper and lights!!

I just sealed the wooden shingles so hopefully they will be protected from dirt and dust etc. I can imagine that the roof would be a pain to dust. I used Patricia Nimocks clear acrylic sealant with the matte finish in two coats.


Also, boyfriend is out of town at a football game and my friend who I was going to hang out with today felt sick and stayed home so I decided I would tinker with dollhouse stuff. A little while ago I found all these printable miniature stuff from jim's printable mini's website. These are the ones I found too cute to turn down...
This barn is for Kristian because he loves old, red barns :). It's a toy barn for the nursery.

I couldn't turn down this trunk, I'm hooked on trunks right now...

The trunk exterior

Antique children's book

Antique children's book

Cover of the sheet music for the piano

Sheet music

Board games for the nursery: checkers, monopoly, chess and wordup

A block of encyclopedias

Playing cards, too cute to pass up, but the holder wasn't sized right so I will have to come up with some other way to contain them.
I am also working on the lighting in the dollhouse. Yes, I am installing lights :). I checked out the available dollhouse lighting systems and they seem both overpriced and incredibly limited. I will use LED's because our doll's don't like wasting energy. Actually, I just like that LED's won't get hot like incandescent lights do. I got a transformer power supply from the local electronics store in Berkeley. It's basically a toy store for electronics geeks like me. It takes 120 V AC power to 12 V DC power, perfect for LED's. I also have a bunch of resistors I will solder in to keep the current down in the LED circuits, I don't want them to burn out too fast.

The first lighting set I am working on is the fireplace. I got 2 yellow and 2 red flickering LED's for the fireplace and wired them to the transformer. They work!

red and yellow flicker LED's for the fire place
I also snagged a thin branch from the pear farm when we were last up there to break into fire wood. So now that I know its working, I can start wiring up the house. Don't worry parents, I'll make sure there are no live wires accessible by little fingers. :)