Thursday, November 8, 2012

More history and finished dollhouse roof shingles!

Here is another piece of dollhouse history.... I had this sitting in my room for years as a girl and never once looked at the bottom of the dollhouse. So when I began striping and sanding the interior and exterior, I was really surprised to see this on the bottom of the dollhouse.


It's a bit hard to read, but it says,

PERISHABLE
HARVARD BRAND FANCY FILLETS
WHITMAN WA?? & LEE CO
SOLE PRODUCERS AND DISTRIBUTORS
3-15 FISH PIER    BOSTON MASS

In the upper left hand corner there is another paragraph, shown magnified below.


 It reads,

NOTICE TO EXPRESS AGENTS
IF CONSIGNEES REFUSE SHIP-
MENTS OR CANNOT BE LOCATED
WIRE US IMMEDIATELY AT OUR 
EXPENSE

The white patch on the center of the bottom is actually a small piece of wallpaper that looks like what was previously on the master bedroom walls. Its pretty faded, but in better shape than the paper that was actually on the walls.


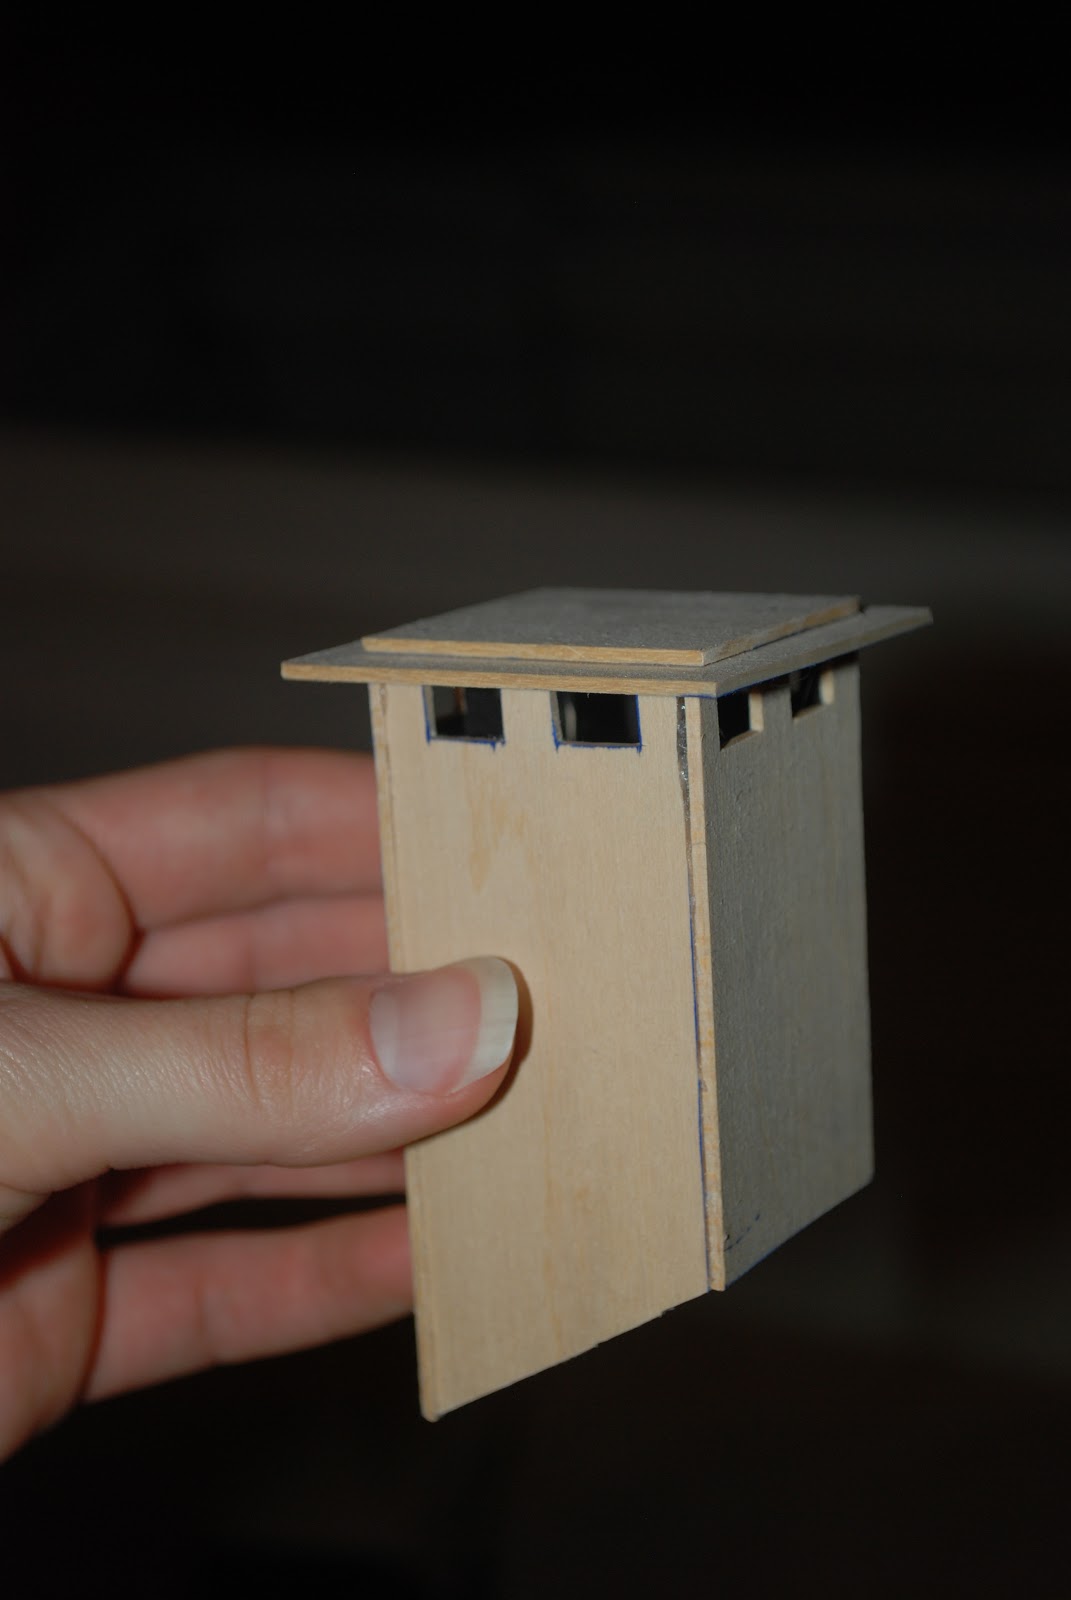
So now that the roof of the dollhouse is painted, I can go ahead with the roof shingling project. I painted the roof dark brown so that if the shingles are not perfectly aligned, you won't be able to see the roof plank color because it will look  brown like the shingles.


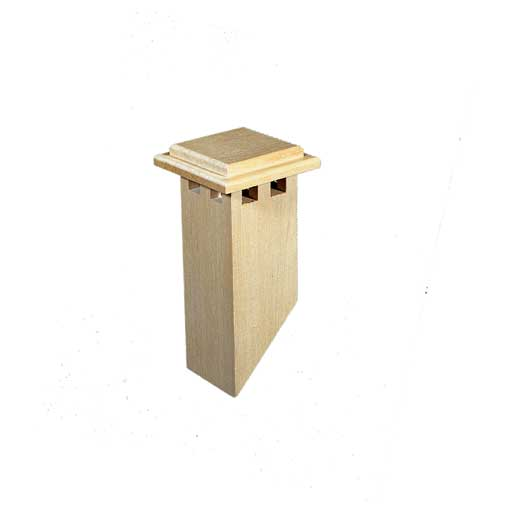
The second half was slightly more difficult because I have to incorporate the chimney. I tried holding it on top of the shingles in place and I don't think that will work, it just doesn't look realistic. What worries me is that I would like to put brick on the chimney, and I don't have the brick compound yet. So I can't finish the chimney yet. I decided to tack it loosely in place as a space holder and do the rest of the shingles around it so that I can still remove it to do the brickwork. It worked pretty well and the shingles fit well around the chimney. I had to cut a number of the shingles into pieces to fit around the chimney. Here is the final result...


I am really happy with how the roof turned out. It really looks very realistic. Soon I would like to do the brick work on the chimney. I have the Bromley Craft Products stencil

http://www.craft-products.com/proddetail.asp?prod=STR

 However, the brick compound is expensive and I think I would need just over one package. I have found some rumors that people have used brick colored grout instead, but I want to make sure that it would finish as hard and tough (read, kid-proof) as the Bromley products do.

If you are interested in how this works check out this tutorial...


It's ambitious but considering how quick and relatively easy the shingling was, I am really tempted to do the whole house in bricks. I think I will definitely do the chimney and the fireplace. The looks I am imagining are...


I probably won't brick the tiny pieces connecting the chimney body to the chimney roof. Also the fireplace will remain open, I have plans for the fire in the fireplace :).


Sunday, November 4, 2012

A chimney and a bit of paint


I decided a chimney would look nice, but all of those available online were for set roof angles and since our dollhouse is unique, it would be a pain to adapt a store bought one... so I decided to make one myself.

I really like the look of this one...
Dollhouse Chimney for sale from various outlets online

So I went about making one out of sheets of basswood, using an exacto blade, a ruler and a hot glue gun. It turned out like this...

My version of the above dollhouse chimney
I colored the inside of the chimney black with a sharpie before gluing the top on. There is another square glued inside for added stability. Next I painted it with primer and then painted it grey. I chose a color as close to cement as I could manage because then I can make the body "brick" with the grout color showing through.

Painted chimney
The next step will be to use a brick stencil to make the bricks. I need to get the brick compound and a stencil adhesive to do this. I will update with pictures when that is done.

Today I was also able to paint the house with a primer and then with the same grey as I used on the chimney. The hope is that I can use the same stencil and brick compound on the body of the dollhouse if it is easy and turns out well. I also primered the roof and painted the top panels dark brown so that it won't be obvious if the roof shows through the shingles.

So after I finished sanding the house looked like this...

You may have noticed that the staircase is missing. I was finally able to carefully pry it out for which I am hugely relieved. I couldn't imagine how I would refinish the hallway while having to work around it. Well underneath the stairs was a swatch of red and white checkered flooring that has to be original because my grandmother said she never removed the staircase since she's had it as a little girl. It was so cool to find a piece of the history of the dollhouse still there!


After priming and painting the house looks like this...
The inside of the dollhouse after primer

The outside of the dollhouse after primer and grey paint

The roof color before application of shingles
The grey looks a bit more blue than I was expecting in this light, but I am not going to worry about that too much until I can see it in natural lighting.

Wednesday, October 31, 2012

Dollhouse shingles

I have been searching dollhouse blogs in order to get inspiration and ideas for the dollhouse and one idea that I absolutely love is real wood shingles! i ordered 7 packages online and they arrived last week. I can't wait to start!

Shingles!!


The first step is to stain the shingles. I have some leftover stain from finishing table legs that I will use to give them some color. Its a dark ebony color, Minwax wood finish. I spot checked the color by hand dipping 4 shingles for 2 different amounts of time. The first two were in for 15 minutes. The second two were in for a few hours. When they were dry overnight, I rubbed them down with a paper towel. This is how they turned out.

Stain test - the upper two were in stain for 15 minutes, the lower two were in for a few hours.

They don't look all that different to me. My sister and boyfriend both thought the lighter ones looked nice so I decided I wouldn't bother steeping the shingles in stain for hours.

I took a glass bowl, dumped in two packages of shingles at a time and covered them (mostly) with the stain. Then I stirred them to make sure they were all getting a coat of stain. After 15 - 40 minutes (I want a bit of color variation so I wasn't too careful about steeping them for the same amount of time) I scooped out the saturated shingles and heaped them into a mound on my cardboard box. By the way, this was all done in a cardboard box to contain the mess. If I hadn't done this, my kitchen floor would look quite different now.


After all the shingles were stained and they had sat in a mound for about an hour, I laid them out in a single layer on more cardboard to dry. They look way more beautiful than I would ever have expected!! Seeing them side by side really gives an idea of what they will look like on the house.

These came out exactly like I was hoping they would!!

After doing this I actually believe I have enough of them to cover the whole roof, I had worried.
Now they are just sitting drying. I will leave them for as long as I can, to allow them to dry thoroughly. After this, I will seal them with clear, matte sealer before gluing them on.

My family dollhouse

When I was a little girl, I had a dollhouse in my room which I loved very much. It was a hand-me-down from my sister, Heather, who had it and loved it before me. It wasn't one of your modern kit-built, super-realistic, dollhouses. It was simple, boxy, not true to scale, but what did we care? It was awesome :)

A month ago I was at my sister's house picking up some boxes from her garage. There in the back was our dollhouse. I exclaimed and pointed it out, Heather said her daughter was too young to use it yet and frankly, it was in pretty rough shape. She asked if I would take it since I have a big storage room. I said sure. Then she made a suggestion, "Why don't you refurbish it?" So I decided I would do just that.

But what was the story behind the house? It looked like it had seen more years than just those it had spent with my sister and I. I called my grandmother to get the background story.

When my grandmother was a little girl in Finley, Ohio around 1925, she and her little sister used to play with a box, pretending it was a dollhouse. Then one day, it disappeared. They looked everywhere for their box-dollhouse but nobody could tell where it had gone. Months went by and Christmas rolled around. What should the two little girls find under the tree but their box-dollhouse. Only now, it actually looked like a dollhouse!!

Their father, who was a quiet man who loved to read, wasn't one to build random things. However, on a number of occasions he did surprise his girls with handmade treasures. Once it was a small table-bench set where they could sit and work on their own projects. Another time is was a doll's bed. This time, however, it was a beautiful new dollhouse. It wasn't a refined job, but it was perfect for two little girls with big imaginations. For example, the roof sat on top of the box and wasn't closed in on either end and the windows were just holes. The rest of the dollhouse was decorated and furnished by my grandmother's mother.

When grandma and her sister were done playing with dollhouses, it stayed at my great grandmother's house for a while. Eventually, when grandma had two little girls of her own (besides my father), she retrieved the dollhouse and she and my grandfather fixed it up for my aunts. My grandfather made the roof look nicer, closed in on the end and fitted to the house. He also fixed up the windows. My grandmother redecorated the house and it was given to my aunts. They played with it during their girlhood and, when they were done with it, it moved back to my great grandmother's house. It stayed there until my great grandmother moved into my grandmother's house. Then the dollhouse returned.

In 1979, my sister was about to be 5, the perfect age to receive a dollhouse. Aunt Lynne and grandma pulled out the house and re-decorated the interior. The dollhouse lived with my sister for many years and was eventually passed to me. I eventually outgrew it and the dollhouse and it went to my younger cousin for another 5 years. When she outgrew it, it was stored away in various locations and moved a number of times until it ended up in my sister's garage. Now it is back with me and the refurbishing process has begun. I am refinishing this house for my two 3-year-old nieces and later, hopefully, my own children.

My grandmother and great aunt played with it.
My 2 aunts played with it.
My sister, cousin and I played with it.
Soon, my nieces will play with it.
This means the dollhouse, which is now 87 years old, will be played with by a fourth generation of my family. It is a 4th generation dollhouse.

I don't have any pictures of it from when I was a girl, however, I believe my sister may have some. I do have some pictures of the process so far though. I started by removing the furnishings and curtains and fixtures. Much of the wallpaper was falling off so I removed that as well. These are photos of the interior furnishings.

Bathroom furniture

Bedroom furniture - made by my grandfather and grandmother.

dining room furniture

Doll family

dressers and cupboards

Kitchen furniture - this may need to be updated.

Living room furniture

Other miscellaneous items

Nursery furniture

Wall hangings


Removing the carpet was difficult but I found that directing a blow-dryer onto each section as i was removing it allowed the process to go more smoothly.

The interior of the dollhouse with the rooms labeled.
The exterior of the dollhouse, you can see where the roof fits onto the original house box.


The next step will be sanding the entire house down to prepare it for primer and paint. This will be done in the near future (I hope!).